Introduction
A design pattern is not a rigid structure to be transplanted directly into source code. Rather, it is a description or a template for solving a particular type of problem that can be deployed in many different situations.Design patterns can be viewed as formalized best practices that the programmer may use to solve common problems when designing a software application or system. Expert object-oriented software engineers use these best practices to write more structured, manageable, and scalable code. Design patterns provide a standard terminology and are specific to particular scenarios and problems.
Object-oriented design patterns typically show relationships and interactions between classes or objects, without specifying the final application classes or objects that are involved.[citation needed] Patterns that imply mutable state may be unsuited for functional programming languages. Some patterns can be rendered unnecessary in languages that have built-in support for solving the problem they are trying to solve, and object-oriented patterns are not necessarily suitable for non-object-oriented languages.
Types of Design Patterns
- Creational Patterns
- Structural Patterns
- Behavioral Patterns
Key Characteristics of Design Patterns
- Reusability: Patterns can be applied to different projects and problems, saving time and effort in solving similar issues.
- Standardization: They provide a shared language and understanding among developers, helping in communication and collaboration.
- Efficiency: By using these popular patterns, developers can avoid finding the solution to same recurring problems, which leads to faster development.
- Flexibility: Patterns are abstract solutions/templates that can be adapted to fit various scenarios and requirements.
Creational Patterns
Core Purpose: Encapsulate object creation logic to decouple object creation from usage.
Factory Pattern
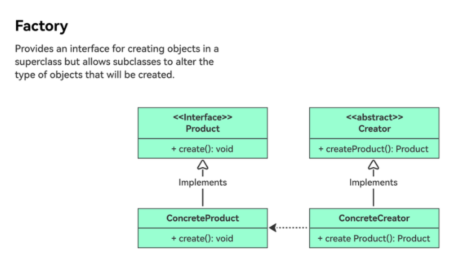
Definition: Uses a factory class to encapsulate object creation, hiding implementation details.
Case: Creating different payment methods in an e-commerce platform.
1 | // Abstract Product: Payment interface |
Abstract Factory
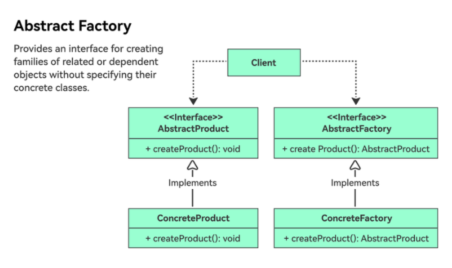
The Abstract Factory Pattern is a creational design pattern that provides an interface for creating families of related or dependent objects without specifying their concrete classes. It encapsulates a group of individual factories that have a common theme, ensuring product compatibility and decoupling client code from implementation details.
Core Concepts:
- Abstract Factory: Defines interfaces for creating abstract products.
- Concrete Factories: Implement the abstract factory to produce specific product families.
- Abstract Products: Declare interfaces for a type of product.
- Concrete Products: Implement the abstract product interfaces, created by concrete factories.
- Client: Uses the abstract factory and products without depending on concrete classes.
UML Diagram:
1 | ┌──────────────────┐ ┌─────────────────┐ |
Case: Cross-platform UI components (Windows vs. macOS)
1 | // Button Interface |
Use Cases:
- Cross-platform Applications: As shown in the example above.
- Game Development: Creating different enemy types, weapons, or environments.
- Database Access: Switching between SQL Server, MySQL, etc.
- UI Frameworks: Generating themed components (light/dark mode).
Builder Pattern
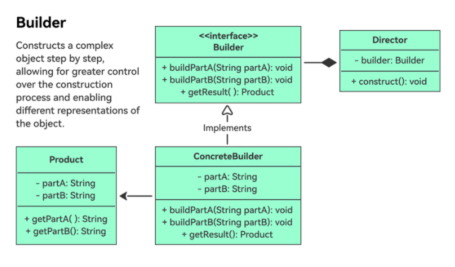
The Builder Pattern is a creational design pattern that separates the construction of a complex object from its representation. This allows the same construction process to create different representations, making it ideal for objects with multiple optional parameters or complex assembly steps.
Core Concepts:
- Product: The complex object being constructed (e.g., a car, user profile).
- Abstract Builder: Defines an interface for building parts of the product.
- Concrete Builder: Implements the builder interface to construct specific product variations.
- Director: Controls the construction process, using the builder to assemble the product step-by-step.
UML Diagram:
1 | ┌───────────┐ ┌─────────────┐ |
Case:Building a computer with optional components (CPU, GPU, RAM).
1 | //define the product |
Output:
1 | Computer Specs: |
Use Cases:
- Complex Objects with Many Parameters: E.g., cars, user profiles, or API requests with optional fields.
- Object Assembly with Order Dependency: When parts must be added in a specific sequence (e.g., initializing components before final assembly).
- Fluent Interfaces: Commonly used to create fluent APIs for readability (e.g., StringBuilder in .NET).
Singleton Pattern
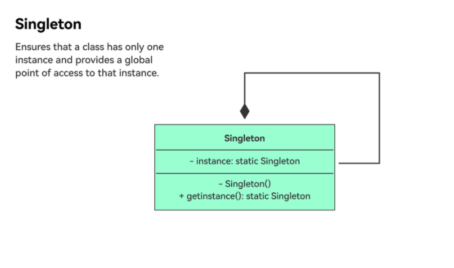
The Singleton Pattern is a creational design pattern that ensures a class has only one instance and provides a global point of access to it. This pattern is useful for systems where exactly one instance is needed to coordinate actions across the system, such as a database connection pool, logging service, or configuration manager.
Core Concepts:
- Private Constructor: Prevents direct instantiation of the class from outside.
- Static Instance: Holds the single instance of the class.
- Public Static Accessor: Provides global access to the instance.
UML Diagram:Implementation Variations:1
2
3
4
5
6
7┌───────────────┐
│ Singleton │
├───────────────┤
│- instance: static Singleton
│+ GetInstance(): static Singleton
│+ DoSomething(): void
└───────────────┘ - Basic Singleton (Not Thread-Safe)Issue: Not thread-safe. Multiple threads can create instances simultaneously in a multi-threaded environment.
1
2
3
4
5
6
7
8
9
10
11
12
13
14
15
16
17
18
19
20public class Singleton
{
private static Singleton _instance;
private Singleton() { } // Private constructor
public static Singleton GetInstance()
{
if (_instance == null)
{
_instance = new Singleton();
}
return _instance;
}
public void DoSomething()
{
Console.WriteLine("Singleton is working.");
}
} - Thread-Safe Singleton (Double-Checked Locking)
1
2
3
4
5
6
7
8
9
10
11
12
13
14
15
16
17
18
19
20
21
22
23
24
25
26
27public class Singleton
{
private static Singleton _instance;
private static readonly object _lock = new object();
private Singleton() { }
public static Singleton GetInstance()
{
if (_instance == null) // First check
{
lock (_lock) // Lock for thread safety
{
if (_instance == null) // Second check
{
_instance = new Singleton();
}
}
}
return _instance;
}
public void DoSomething()
{
Console.WriteLine("Singleton is working.");
}
} - Lazy Initialization with LazyUse Cases:
1
2
3
4
5
6
7
8
9
10
11
12
13
14
15
16
17public class Singleton
{
private static readonly Lazy<Singleton> _lazy =
new Lazy<Singleton>(() => new Singleton());
private Singleton() { }
public static Singleton GetInstance()
{
return _lazy.Value;
}
public void DoSomething()
{
Console.WriteLine("Singleton is working.");
}
}
- Logging Services: Centralized logging to avoid file conflicts.
- Database Connection Pools: Reuse connections to optimize performance.
- Configuration Managers: Load and manage application settings.
- Graphics Managers: Control rendering or display resources.
Structural Patterns
Structural design patterns explain how to assemble objects and classes into larger structures, while keeping these structures flexible and efficient.
Adapter Pattern
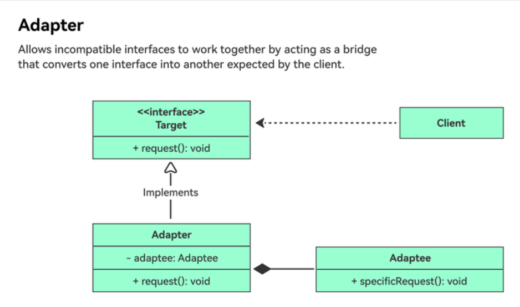
The Adapter Pattern is a structural design pattern that allows objects with incompatible interfaces to collaborate. It acts as a bridge between two incompatible interfaces, converting the interface of one class into another interface clients expect. This pattern is useful for integrating legacy code, third-party libraries, or mismatched components without modifying their original structure.
Core Concepts:
- Target: The interface that the client expects to interact with.
- Adaptee: The existing class with an incompatible interface.
- Adapter: Converts the adaptee’s interface into the target interface via composition or inheritance.
UML Diagram:1
2
3
4
5
6
7
8
9
10┌─────────────┐ ┌──────────────┐ ┌─────────────┐
│ Target │ │ Adapter │ │ Adaptee │
├─────────────┤ ├──────────────┤ ├─────────────┤
│+ Request() │◄───┐ │+ Request() │ │+ SpecificRequest()
└─────────────┘ │ ├──────────────┤ └─────────────┘
│ │- adaptee: Adaptee│ ▲
│ └──────────────┘ │
│ ▲ │
│ │ Implements │
└────────────────────────-----┘ - Object Adapter (Composition)Usage:
1
2
3
4
5
6
7
8
9
10
11
12
13
14
15
16
17
18
19
20
21
22
23
24
25
26
27
28
29
30
31
32
33
34
35
36
37
38
39
40
41
// Target interface
public interface ITarget
{
string Request();
}
// Adaptee (existing class with incompatible interface)
public class Adaptee
{
public string SpecificRequest()
{
return "Specific request from adaptee.";
}
}
// Adapter (wraps the adaptee via composition)
public class Adapter : ITarget
{
private readonly Adaptee _adaptee;
public Adapter(Adaptee adaptee)
{
_adaptee = adaptee;
}
public string Request()
{
// Convert the adaptee's interface to the target interface
return $"Adapter: {_adaptee.SpecificRequest()}";
}
}
// Client code
public class Client
{
public void UseTarget(ITarget target)
{
Console.WriteLine(target.Request());
}
}1
2
3
4var adaptee = new Adaptee();
var adapter = new Adapter(adaptee);
var client = new Client();
client.UseTarget(adapter); // Output: Adapter: Specific request from adaptee. - Class Adapter (Inheritance)Note: Class Adapter requires multiple inheritance (not supported in C#), so this example uses composition instead.
1
2
3
4
5
6
7
8
9
10
11
12
13
14
15
16
17
18
19
20
21
22
23
24
// Target interface
public interface ITarget
{
    string Request();
}

// Adaptee (existing class with incompatible interface)
public class Adaptee
{
    public string SpecificRequest()
    {
        return "Specific request from adaptee.";
    }
}

// Adapter (inherits from both target and adaptee)
public class Adapter : Adaptee, ITarget
{
    public string Request()
    {
        return $"Adapter: {base.SpecificRequest()}";
    }
}
Use Cases: - Legacy System Integration: Connect new code with outdated APIs.
- Third-Party Libraries: Adapt external libraries to match your application’s interface.
- Data Format Conversion: Transform data between incompatible formats (e.g., XML to JSON).
- Cross-Platform Compatibility: Adapt platform-specific APIs to a common interface.
Real-World Examples:
- .NET Framework: StreamReader adapts a Stream to a text reader.
- Java: java.util.Arrays.asList() adapts an array to a List.
- Web APIs: Converting REST API responses to internal data models.
Bridge Pattern
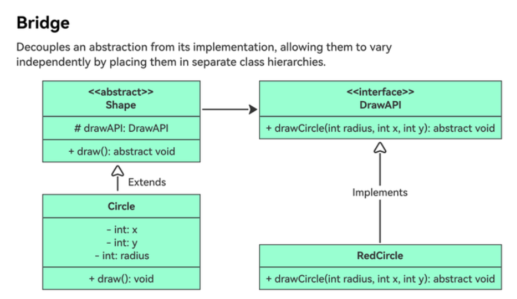
The Bridge Pattern is a structural design pattern that decouples an abstraction from its implementation, allowing both to vary independently. It achieves this by separating the hierarchical abstraction (what the system does) from the implementation (how it does it), connected via a bridge interface. This pattern is particularly useful for avoiding a “class explosion” when dealing with multiple dimensions of variability.
Core Concepts:
- Abstraction: Defines the high-level interface and depends on the implementation interface.
- Refined Abstraction: Extends the abstraction without affecting the implementation.
- Implementor: Defines the interface for the implementation classes.
- Concrete Implementor: Provides the concrete implementation.
UML Diagram:Implementation Example1
2
3
4
5
6
7
8
9
10
11
12
13
14
15
16
17
18
19
20┌────────────────┐ ┌────────────────┐
│ Abstraction │ │ Implementor │
├────────────────┤ ├────────────────┤
│- implementor │ │+ OperationImpl()│
│+ Operation() │ └────────────────┘
└────────────────┘ ▲
▲ │
│ │
┌────────────────┐ ┌─────────────────────┐
│RefinedAbstraction│ │ ConcreteImplementorA │
├────────────────┤ ├─────────────────────┤
│+ ExtendedOperation()│ │+ OperationImpl() │
└────────────────┘ └─────────────────────┘
│
│
┌─────────────────────┐
│ ConcreteImplementorB │
├─────────────────────┤
│+ OperationImpl() │
└─────────────────────┘
Scenario: Rendering shapes (circle, square) in different formats (vector, raster).
1 | //Define the Implementor Interface |
Use Cases:
- Cross-Platform Applications: Separate platform-specific implementations from business logic.
- GUI Frameworks: Render UI components in different styles (e.g., Windows vs. macOS).
- Database Drivers: Connect to different databases (SQL Server, MySQL) using a common interface.
- Game Development: Render graphics using different APIs (DirectX, OpenGL).
Composite Pattern
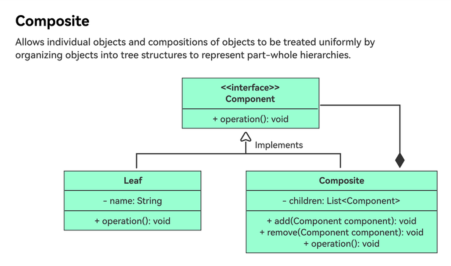
The Composite Pattern is a structural design pattern that lets you compose objects into tree structures to represent part-whole hierarchies. It allows clients to treat individual objects (leaf nodes) and compositions of objects (composite nodes) uniformly, simplifying code by treating all nodes through a common interface.
Core Concepts:
- Component: Defines the common interface for both leaf and composite nodes.
- Leaf: Represents individual objects (no children).
- Composite: Manages child components, implementing the component interface for child-related operations(add, remove and get).
- Client: Interacts with components through the common interface, unaware of whether they are leaves or composites.
UML Diagram:Use case: A file system with directories (composites) and files (leaves).1
2
3
4
5
6
7
8
9
10
11
12
13
14┌──────────────┐
│ Component │
├──────────────┤
│+ Operation() │
└──────────────┘
▲
│-----------------------|
┌──────────────┐ ┌──────────────┐
│ Leaf │ │ Composite │
├──────────────┤ ├──────────────┤
│+ Operation() │ │+ Add() │
│ │ │+ Remove() │
│ │ │+ GetChild() │
└──────────────┘ └──────────────┘Output:1
2
3
4
5
6
7
8
9
10
11
12
13
14
15
16
17
18
19
20
21
22
23
24
25
26
27
28
29
30
31
32
33
34
35
36
37
38
39
40
41
42
43
44
45
46
47
48
49
50
51
52
53
54
55
56
57
58
59
60
61
62
63
64
65
66
67
68
69
70
71
72
73
74
75
76
77
78
79
80
81
82//1. Define the Component Interface
public abstract class FileSystemComponent
{
public abstract void Display(int depth);
public virtual void Add(FileSystemComponent component)
{
throw new NotSupportedException("Leaf nodes cannot have children.");
}
public virtual void Remove(FileSystemComponent component)
{
throw new NotSupportedException("Leaf nodes cannot have children.");
}
}
//2. Implement Leaf Nodes (Files)
public class File : FileSystemComponent
{
private string _name;
public File(string name)
{
_name = name;
}
public override void Display(int depth)
{
Console.WriteLine(new string('-', depth) + _name);
}
}
//3. Implement Composite Nodes (Directories)
public class Directory : FileSystemComponent
{
private string _name;
private List<FileSystemComponent> _children = new List<FileSystemComponent>();
public Directory(string name)
{
_name = name;
}
public override void Display(int depth)
{
Console.WriteLine(new string('-', depth) + _name);
foreach (var child in _children)
{
child.Display(depth + 2); // Indent children
}
}
public override void Add(FileSystemComponent component)
{
_children.Add(component);
}
public override void Remove(FileSystemComponent component)
{
_children.Remove(component);
}
}
//4. Client Code
public class Client
{
public void BuildFileSystem()
{
// Root directory (composite)
Directory root = new Directory("Root");
// Subdirectories and files (composites and leaves)
Directory docs = new Directory("Documents");
docs.Add(new File("Report.txt"));
docs.Add(new File("Budget.xlsx"));
Directory pics = new Directory("Pictures");
pics.Add(new File("Vacation.jpg"));
root.Add(docs);
root.Add(pics);
root.Add(new File("ReadMe.md"));
// Display the file system tree
root.Display(0);
}
}Use Cases:1
2
3
4
5
6
7Root
--Documents
----Report.txt
----Budget.xlsx
--Pictures
----Vacation.jpg
--ReadMe.md
- File Systems: Directories (composites) and files (leaves).
- GUI Toolkits: Containers (e.g., panels) and widgets (e.g., buttons).
- Organization Charts: Departments (composites) and employees (leaves).
- Tree-Based Data Structures: XML/JSON parsing, syntax trees.
Decorator Pattern
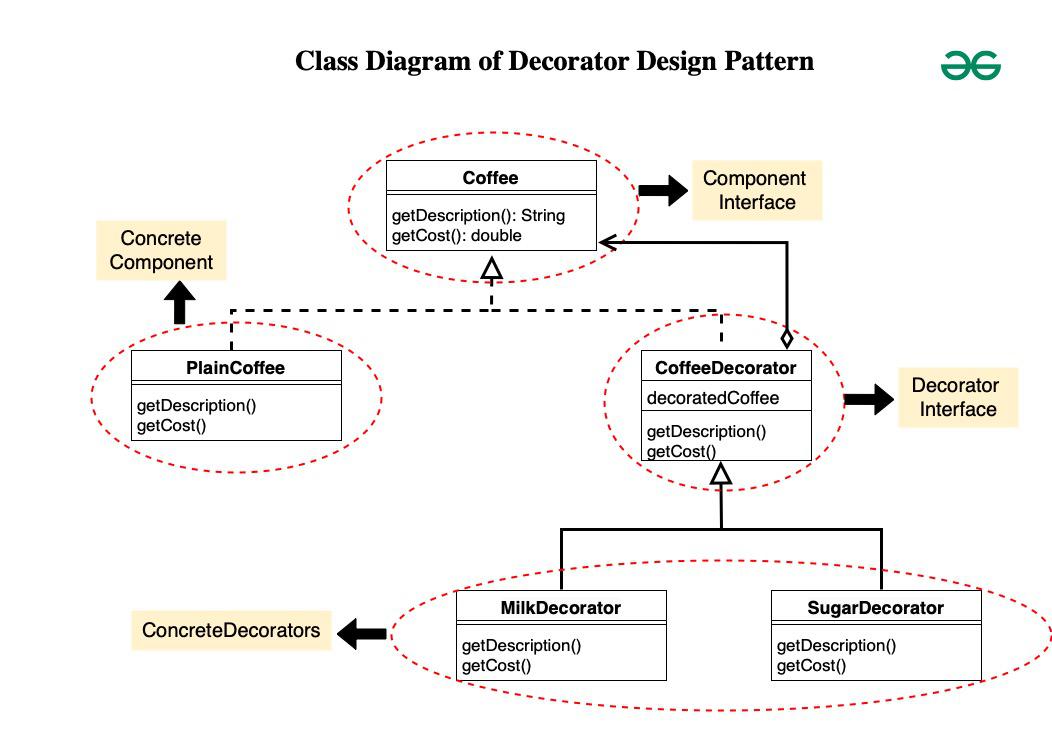
The Decorator Pattern is a structural design pattern that lets you attach new behaviors to objects dynamically by placing these objects inside special wrapper classes. It provides a flexible alternative to subclassing for extending functionality, allowing behavior to be added or removed at runtime.
Core Concepts:
- Component: Defines the common interface for objects that can have decorations.
- Concrete Component: Implements the base functionality of the component.
- Decorator: Maintains a reference to a component and implements the component interface.
- Concrete Decorators: Add specific behaviors to the component by overriding methods.
Use case: Coffee shop where drinks (components) can be decorated with additives (decorators).
1 | //1. Define the Component Interface |
Output:
1 | Espresso = $1.99 |
Use Cases:
GUI Components: Adding borders, scroll bars, or tooltips to widgets.
I/O Streams: Wrapping streams with buffering, encryption, or compression.
Logging: Adding timestamps, metadata, or formatting to log messages.
Security: Applying authentication or authorization layers to requests.
Facade Pattern

The Facade Pattern is a structural design pattern that provides a simplified interface to a complex system of classes, libraries, or APIs. It hides the underlying complexity and exposes only high-level functionality, making the system easier to use and maintain. This pattern is commonly used to decouple clients from intricate subsystems.
Core Concepts:
- Facade: Provides a simplified interface to the subsystem.
- Subsystem Classes: Implement complex functionality but are unaware of the facade.
- Client: Interacts with the facade instead of directly accessing subsystem classes.
UML DiagramUase case: A home theater system with multiple components (amplifier, DVD player, projector).1
2
3
4
5
6
7
8
9
10
11
12
13┌──────────────┐ ┌──────────────────┐
│ Client │──────►│ Facade │
└──────────────┘ ├──────────────────┤
│+ SimpleOperation()│
└──────────────────┘
▲
│ uses
│
┌──────────────┐ ┌──────────────┐ ┌──────────────┐
│ SubsystemA │ │ SubsystemB │ │ SubsystemC │
├──────────────┤ ├──────────────┤ ├──────────────┤
│+ OperationA()│ │+ OperationB()│ │+ OperationC()│
└──────────────┘ └──────────────┘ └──────────────┘Output:1
2
3
4
5
6
7
8
9
10
11
12
13
14
15
16
17
18
19
20
21
22
23
24
25
26
27
28
29
30
31
32
33
34
35
36
37
38
39
40
41
42
43
44
45
46
47
48
49
50
51
52
53
54
55
56
57
58
59
60
61
62
63
64
65
66
67
68
69
70
71
72
73
74
75
761. Define Subsystem Classes
// Subsystem: Amplifier
public class Amplifier
{
public void On() => Console.WriteLine("Amplifier on");
public void Off() => Console.WriteLine("Amplifier off");
public void SetVolume(int level) => Console.WriteLine($"Amplifier volume set to {level}");
}
// Subsystem: DVD Player
public class DvdPlayer
{
public void On() => Console.WriteLine("DVD Player on");
public void Off() => Console.WriteLine("DVD Player off");
public void Play(string movie) => Console.WriteLine($"DVD Player playing '{movie}'");
}
// Subsystem: Projector
public class Projector
{
public void On() => Console.WriteLine("Projector on");
public void Off() => Console.WriteLine("Projector off");
public void SetInput(DvdPlayer dvd) => Console.WriteLine("Projector input set to DVD");
}
2. Create the Facade
//public class HomeTheaterFacade
{
private readonly Amplifier _amp;
private readonly DvdPlayer _dvd;
private readonly Projector _projector;
public HomeTheaterFacade(Amplifier amp, DvdPlayer dvd, Projector projector)
{
_amp = amp;
_dvd = dvd;
_projector = projector;
}
public void WatchMovie(string movie)
{
Console.WriteLine("Get ready to watch a movie...");
_amp.On();
_projector.On();
_projector.SetInput(_dvd);
_dvd.On();
_dvd.Play(movie);
_amp.SetVolume(10);
}
public void EndMovie()
{
Console.WriteLine("Shutting movie theater down...");
_dvd.Off();
_projector.Off();
_amp.Off();
}
}
//3. Client Code
public class Client
{
public void UseHomeTheater()
{
// Initialize subsystems
var amp = new Amplifier();
var dvd = new DvdPlayer();
var projector = new Projector();
// Create facade
var homeTheater = new HomeTheaterFacade(amp, dvd, projector);
// Simplified interface
homeTheater.WatchMovie("Avatar");
Console.WriteLine("\n");
homeTheater.EndMovie();
}
}Use Cases:1
2
3
4
5
6
7
8
9
10
11
12Get ready to watch a movie...
Amplifier on
Projector on
Projector input set to DVD
DVD Player on
DVD Player playing 'Avatar'
Amplifier volume set to 10
Shutting movie theater down...
DVD Player off
Projector off
Amplifier off
- Complex APIs: Simplify third-party libraries (e.g., cloud storage APIs).
- Legacy Systems: Provide a modern interface to outdated code.
- Cross-Layer Communication: Bridge different layers in an application (e.g., UI and business logic).
- Testing: Create facades to mock complex subsystems during unit testing.
Flyweight Pattern
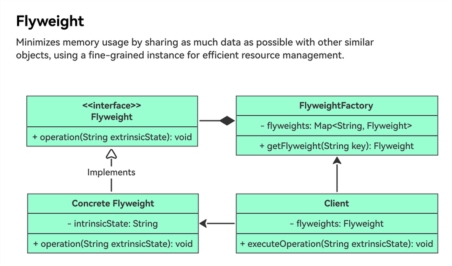
The Flyweight Pattern is a structural design pattern that minimizes memory usage by sharing as much data as possible between similar objects. It achieves this by separating intrinsic (shared) state from extrinsic (context-specific) state, allowing objects to be reused across different contexts. This pattern is particularly useful for optimizing memory when dealing with large numbers of similar objects.
Core Concepts:
- Flyweight: Defines the interface for shared objects, managing intrinsic state.
- Concrete Flyweight: Implements the flyweight interface and stores intrinsic state.
- Flyweight Factory: Manages a pool of flyweight objects, ensuring they are shared and reused.
- Client: Holds extrinsic state and uses the flyweight factory to obtain flyweight instances.
Complete code of the flyweight design pattern:
1 | import java.util.HashMap; |
Use Cases:
- Graphics Systems: Reuse shared textures, sprites, or glyphs.
- Game Development: Share common assets (e.g., terrain tiles, enemy models).
- Document Editors: Reuse characters, fonts, or formatting styles.
- Database Connections: Pool and reuse connection objects.
Proxy Pattern
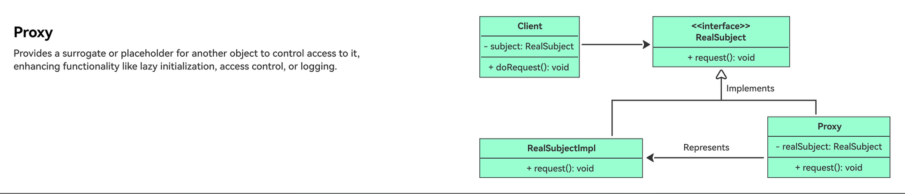
The Proxy Pattern is a structural design pattern that provides a surrogate or placeholder for another object to control access to it. Proxies act as intermediaries between clients and real objects, allowing additional functionality (e.g., lazy loading, access control, logging) without changing the real object’s interface.
Core Concepts
- Subject: Defines the common interface for the RealSubject and Proxy.
- RealSubject: Implements the subject interface, containing the actual business logic.
- Proxy: Maintains a reference to the RealSubject and controls access to it.
- Client: Interacts with the Proxy as if it were the RealSubject.
UML Diagram:Use case:A high-resolution image loader with lazy initialization.1
2
3
4
5
6
7
8
9
10
11
12
13┌──────────────┐ ┌──────────────┐ ┌──────────────┐
│ Subject │ │ Proxy │ │ RealSubject │
├──────────────┤ ├──────────────┤ ├──────────────┤
│+ Request() │ │- realSubject │ │+ Request() │
└──────────────┘ │+ Request() │ └──────────────┘
▲ └──────────────┘ ▲
│ ▲ │
│ │ │
└─────────────────────┼───────────────────── ┘
│
┌───────────────────────────────────────────────────────┐
│ Client │
└───────────────────────────────────────────────────────┘Output:1
2
3
4
5
6
7
8
9
10
11
12
13
14
15
16
17
18
19
20
21
22
23
24
25
26
27
28
29
30
31
32
33
34
35
36
37
38
39
40
41
42
43
44
45
46
47
48
49
50
51
52
53
54
55
56
57
58
59
60
61//1. Define the Subject Interface
public interface IImage
{
void Display();
}
//2. Implement the RealSubject
public class RealImage : IImage
{
private readonly string _fileName;
public RealImage(string fileName)
{
_fileName = fileName;
LoadFromDisk(_fileName);
}
public void Display()
{
Console.WriteLine($"Displaying {_fileName}");
}
private void LoadFromDisk(string fileName)
{
Console.WriteLine($"Loading {fileName}");
}
}
//3. Implement the Proxy
public class ProxyImage : IImage
{
private RealImage _realImage;
private readonly string _fileName;
public ProxyImage(string fileName)
{
_fileName = fileName;
}
public void Display()
{
if (_realImage == null)
{
_realImage = new RealImage(_fileName);
}
_realImage.Display();
}
}
//4. Client Code
public class Client
{
public void UseImage()
{
IImage image = new ProxyImage("high_res.jpg");
// Image is not loaded until Display() is called
Console.WriteLine("Calling Display() for the first time:");
image.Display();
Console.WriteLine("\nCalling Display() again:");
image.Display();
}
}Use Cases:1
2
3
4
5
6Calling Display() for the first time:
Loading high_res.jpg
Displaying high_res.jpg
Calling Display() again:
Displaying high_res.jpg
- Remote Proxies: Hide network communication details (e.g., .NET Remoting).
- Virtual Proxies: Delay expensive operations (e.g., lazy loading images).
- Protection Proxies: Control access based on permissions (e.g., user roles).
- Smart References: Add additional behavior when accessing an object (e.g., reference counting).
Behavioral Patterns
Observer Pattern
The Observer Pattern is a behavioral design pattern that establishes a one-to-many dependency between objects. When one object (the subject) changes state, all its dependents (the observers) are notified and updated automatically. This pattern is ideal for implementing event-driven systems, where multiple components need to react to state changes.
Core Concepts:
- Subject: Manages a list of observers and notifies them of state changes.
- Observer: Defines an interface for receiving updates from the subject.
- Concrete Subject: Implements the subject interface and stores state that interests observers.
- Concrete Observer: Implements the observer interface and maintains a reference to the concrete subject.
1 | import java.util.ArrayList; |
Output:
1 | Phone Display: Weather updated - Sunny |
Real-World Examples:
- Java Event Listeners: ActionListener in Swing components.
- .NET Events: System.EventHandler and event subscribers.
- RxJava/Rx.NET: Reactive Extensions use the observer pattern for asynchronous streams.
Iterator Pattern
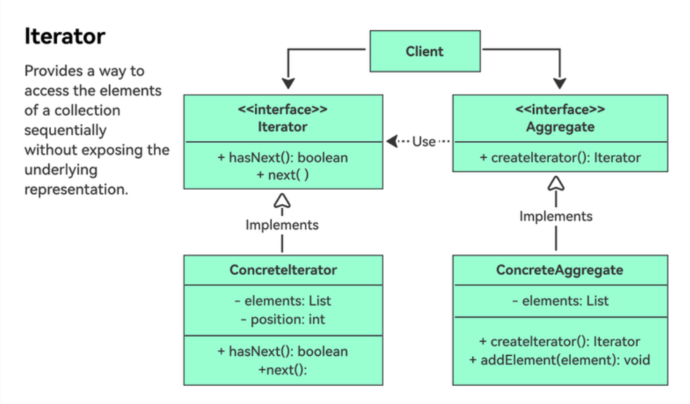
The Iterator Pattern is a behavioral design pattern that provides a way to access the elements of an aggregate object (e.g., a collection) sequentially without exposing its underlying representation. It decouples the traversal logic from the collection, allowing different traversal algorithms or multiple traversals simultaneously.
Core Concepts:
- Iterator: Defines an interface for accessing and traversing elements.
- Concrete Iterator: Implements the iterator interface, tracking the current position in the collection.
- Aggregate: Defines an interface for creating an iterator.
- Concrete Aggregate: Implements the aggregate interface to return a concrete iterator.
Use case: A custom collection (name repository) with a forward iterator.Output:1
2
3
4
5
6
7
8
9
10
11
12
13
14
15
16
17
18
19
20
21
22
23
24
25
26
27
28
29
30
31
32
33
34
35
36
37
38
39
40
41
42
43
44
45
46
47
48
49
50
51
52
53
54
55
56
57
58
59
60
61//1. Define the Iterator Interface
public interface IIterator<T>
{
bool HasNext();
T Next();
}
//2. Define the Aggregate Interface
public interface IAggregate<T>
{
IIterator<T> CreateIterator();
}
//3. Implement the Concrete Iterator
public class NameIterator : IIterator<string>
{
private readonly string[] _names;
private int _position = 0;
public NameIterator(string[] names)
{
_names = names;
}
public bool HasNext()
{
return _position < _names.Length && _names[_position] != null;
}
public string Next()
{
if (HasNext())
{
return _names[_position++];
}
return null;
}
}
//4. Implement the Concrete Aggregate
public class NameRepository : IAggregate<string>
{
private readonly string[] _names = { "Alice", "Bob", "Charlie", "David" };
public IIterator<string> CreateIterator()
{
return new NameIterator(_names);
}
}
//5. Client Code
public class Client
{
public void UseIterator()
{
IAggregate<string> repository = new NameRepository();
IIterator<string> iterator = repository.CreateIterator();
Console.WriteLine("Names:");
while (iterator.HasNext())
{
Console.WriteLine(iterator.Next());
}
}
}Use Cases:1
2
3
4
5Names:
Alice
Bob
Charlie
David
- Custom Collections: Traverse non-standard data structures (e.g., trees, graphs).
- Database Results: Iterate over query results without exposing underlying data.
- File System Navigation: Traverse directories and files.
- Parallel Processing: Split traversal tasks across multiple threads.
Command Pattern
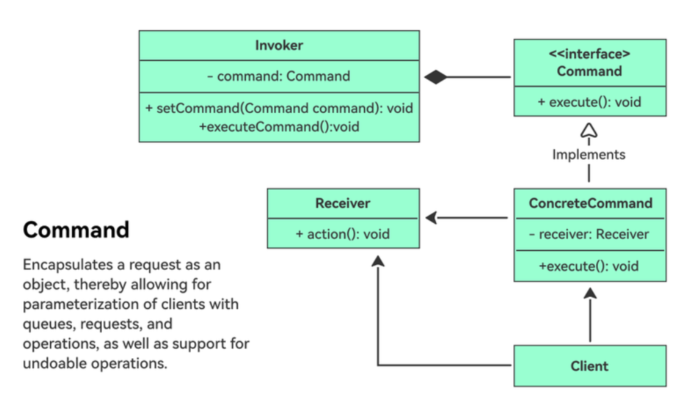
The Command Pattern is a behavioral design pattern that turns a request into a stand-alone object, containing all information about the request. This decouples the sender (invoker) from the receiver (executor), allowing requests to be parameterized, queued, logged, or undone.
Core Concepts:
- Command: Defines an interface for executing an operation.
- Concrete Command: Implements the command interface, binding a receiver to an action.
- Invoker: Asks the command to carry out the request.
- Receiver: Knows how to perform the operation associated with the command.
- Client: Creates a concrete command and sets its receiver.
Uase case: A remote control (invoker) that can turn on/off a light (receiver) using commands.Use Cases:1
2
3
4
5
6
7
8
9
10
11
12
13
14
15
16
17
18
19
20
21
22
23
24
25
26
27
28
29
30
31
32
33
34
35
36
37
38
39
40
41
42
43
44
45
46
47
48
49
50
51
52
53
54
55
56
57
58
59
60
61
62
63
64
65
66
67
68
69
70
71
72
73
74
75
76
77
78
79
80
81
82
83
84
85
86//1. Define the Command Interface
public interface ICommand
{
void Execute();
void Undo(); // Optional for undo functionality
}
//2. Implement Concrete Commands
// Light On Command
public class LightOnCommand : ICommand
{
private readonly Light _light;
public LightOnCommand(Light light)
{
_light = light;
}
public void Execute() => _light.TurnOn();
public void Undo() => _light.TurnOff();
}
// Light Off Command
public class LightOffCommand : ICommand
{
private readonly Light _light;
public LightOffCommand(Light light)
{
_light = light;
}
public void Execute() => _light.TurnOff();
public void Undo() => _light.TurnOn();
}
//3. Define the Receiver
public class Light
{
public void TurnOn() => Console.WriteLine("Light is on");
public void TurnOff() => Console.WriteLine("Light is off");
}
//4. Implement the Invoker
public class RemoteControl
{
private ICommand _command;
public void SetCommand(ICommand command)
{
_command = command;
}
public void PressButton()
{
_command.Execute();
}
public void PressUndoButton()
{
_command.Undo();
}
}
//5. Client Code
public class Client
{
public void UseRemoteControl()
{
// Create receiver
Light light = new Light();
// Create commands
ICommand lightOn = new LightOnCommand(light);
ICommand lightOff = new LightOffCommand(light);
// Create invoker
RemoteControl remote = new RemoteControl();
// Use invoker to execute commands
remote.SetCommand(lightOn);
remote.PressButton(); // Output: Light is on
remote.SetCommand(lightOff);
remote.PressButton(); // Output: Light is off
// Undo last command
remote.PressUndoButton(); // Output: Light is on
}
}
- GUI Buttons: Map button clicks to specific actions (e.g., “Save” command).
- Undo/Redo Systems: Track and reverse user actions in applications.
- Transaction Management: Group commands into atomic operations.
- Networking: Send commands over a network (e.g., remote procedure calls).
Real-World Examples:
- Java Thread Pool: Runnable and Callable interfaces act as commands.
- .NET Delegate: Encapsulates a method call as an object.
- GUI Frameworks: Action classes (e.g., javax.swing.Action in Java).
Strategy Pattern
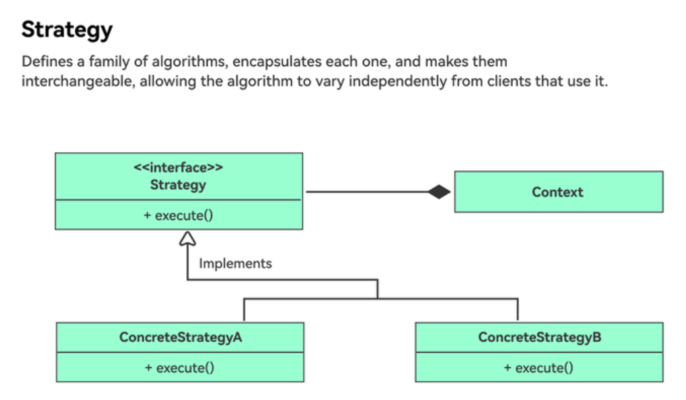
The Strategy Pattern is a behavioral design pattern that defines a family of algorithms, encapsulates each one, and makes them interchangeable. It lets the algorithm vary independently from the clients that use it, promoting flexibility and maintainability.
Core Concepts:
- Strategy: Defines the common interface for all concrete algorithms.
- Concrete Strategies: Implement the strategy interface with specific algorithms.
- Context: Maintains a reference to a strategy and uses it to perform a task.
- Client: Configures the context with a specific strategy.
Use case: A payment processor supporting multiple payment methods (credit card, PayPal).
1 | //1. Define the Strategy Interface |
Output:
1 | plaintext |
Use Cases:
- Sorting Algorithms: Choose between quicksort, mergesort, or bubblesort dynamically.
- Encryption/Compression: Switch between different algorithms (e.g., AES vs. RSA).
- Payment Processing: Support multiple payment methods (credit card, PayPal, Apple Pay).
- Game AI: Implement different behaviors for characters (aggressive, defensive, passive).
State Pattern
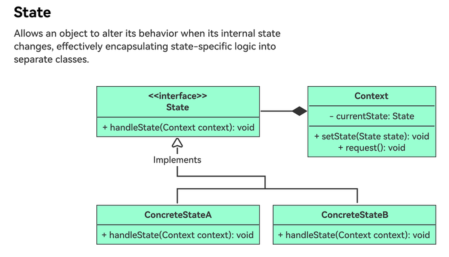
The State Pattern is a behavioral design pattern that allows an object to alter its behavior when its internal state changes. The object will appear to change its class, as the pattern encapsulates state-specific behaviors into separate state classes and delegates to the current state. This simplifies complex state-dependent logic and adheres to the Open/Closed Principle.
Core Concepts:
- Context: Maintains an instance of a concrete state, which represents its current state.
- State Interface: Defines a common interface for all concrete states.
- Concrete States: Implement the state interface, providing behavior specific to a state.
- State Transitions: Managed by the state classes themselves or the context, depending on the implementation.
Use case:User interactions with the vending machine trigger state transitions. For example, when a user inserts money, the vending machine transitions from the “ReadyState” to the “PaymentPendingState.”
1 | interface VendingMachineState { |
Output:
1 | Ready state: Please select a product. |
When to use the State Design Pattern:
The State design pattern is beneficial when you encounter situations with objects whose behavior changes dynamically based on their internal state. Here are some key indicators:
- Multiple states with distinct behaviors: If your object exists in several states (e.g., On/Off, Open/Closed, Started/Stopped), and each state dictates unique behaviors, the State pattern can encapsulate this logic effectively.
- Complex conditional logic: When conditional statements (if-else or switch-case) become extensive and complex within your object, the State pattern helps organize and separate state-specific behavior into individual classes, enhancing readability and maintainability.
- Frequent state changes: If your object transitions between states frequently, the State pattern provides a clear mechanism for managing these transitions and their associated actions.
- Adding new states easily: If you anticipate adding new states in the future, the State pattern facilitates this by allowing you to create new state classes without affecting existing ones.